
With the KLF200, Velux offers an ethernet-based device to control shutters and other wireless components. But their implementation is a disaster for DIY-homes. With an ESP8266 I fixed this mess...
Attic = sweating
Its June and here in Germany and the sun is very powerful now. Together with my wife and four kids I'm living in an attic apartment in a 200-year old house. During a house renovation in 2006 we added 20cm of rockwool as thermal insulation to the roof. Additionally we added shutters for the roof windows made by Velux. The first couple of years this worked well with the manual remote-controls. But sometimes we forgot to close the shutters in the morning, went to work and when we came back the temperature has reached 28 or even up to 30°C in our living-room. So I bought a Velux Integra Control to have the option to control the shutters by a schedule. It was fine for the first couple of months but then I updated our home with Node-RED and had much more options but the small control was not able to connect to the network so another option had to be found.
More "smart" for my home
With the KLF200, Velux actually offers a network-compatible device for controlling its roller shutters and roof surface darkening systems. Unfortunately, there are some design problems with the available firmware version 2.0.0.71: if the network connection is interrupted (e.g. due to a reboot of the network switch), the TCP connection remains open internally. As the device supports a maximum of two TCP connections, there is only one option left to communicate with the device. If this also breaks off, the device is deaf and mute on the network connection until the next reboot.

HomeAssistant and FHEM have solved this problem in such a way that the KLF200 is rebooted immediately when a connection is established to ensure that the first link is established. If the connection is disconnected once, the second connection is established, the device is rebooted and the first connection is established again - that's stupid...
DIY to solve manufacturers' problems
So my idea was to take a small ESP8266, connect the input channels of the KLF200 internally to the ESP8266 and teach the ESP MQTT via the PubSubClient library. As the KLF200 uses a regular USB-connection as power-supply, 5V are available at the input. So first I soldered two lines from the USB-port to the Vin and GND of the ESP8266 to supply this device. First I had to bring the ESP to my homes WiFi:
void wifiInit() {
  // Start WiFi as station (client)
  WiFi.mode(WIFI_STA);
  WiFi.begin("SSID", "PASSWORD");

  // Wait for connection
  while (WiFi.status() != WL_CONNECTED) {
      delay(500);
  }
}

void mqttInit() {
  mqttclient.setServer("192.168.0.42", 1883);
  mqttclient.setCallback(MQTT_callback);
  if (mqttclient.connect("veluxKLF200")) {
    for (int i=0; i<(lastVeluxChannel/2); i++) {
      mqttclient.subscribe(String("attic/shutter/velux" + String(i+1)).c_str());
    }
  }
}
Now that we are connected to the WiFi and the MQTT-broker, I had to program some code to react on incoming MQTT-messages. The callback-function look like this:
void MQTT_callback(char* topic, byte* payload, unsigned int length) {
  payload[length] = '\0'; // null-terminate byte-array

  // process received message
  for (uint8_t ch=0; ch < lastVeluxChannel; ch++) {
    if (strcmp(topic, String("attic/shutter/velux" + String(ch+1)).c_str()) == 0) {
      veluxSetShutterState(ch, String((char*)payload).toInt());
    }
  }
}
The Velux KLF200 has two inputs per channel. Using the webinterface you can program one of the two inputs to close the shutter and the other one to open it and specific positions are possible as well. If both inputs are asserted together, a third option (a "stop" for instance) is possible. So the function "veluxSetShutterState" has to set both input-channels of the KLF200 depending on the desired state:
void veluxSetShutterState(uint8_t channel, int8_t state) {
  if (state > 0) {
    // move up = enable KLF channel 1 for 0.7s
    veluxSetChannel(1 + channel * 2, true);
    shutterDisableCounter[channel * 2] = 7; // wait 0.7s
  }else if (state == 0) {
    // stop = enable KLF channel 1 and 2 for 0.7s
    veluxSetChannel(1 + channel * 2, true);
    veluxSetChannel(1 + channel * 2 + 1, true);
    shutterDisableCounter[channel * 2] = 7; // wait 0.7s
    shutterDisableCounter[channel * 2 + 1] = 7; // wait 0.7s
  }else if (state < 0) {
    // move down = enable KLF channel 2 for 0.7s
    veluxSetChannel(1 + channel * 2 + 1, true);
    shutterDisableCounter[channel * 2 + 1] = 7; // wait 0.7s
  }
}
Now most of the magic is already done: veluxSetChannel() simply sets one of the individual GPIOs of the ESP to either high or low. shutterDisableCounter is a small array. Its content is read by a timer-function every 100ms to disable the GPIOs within a desired time:
void Timer100msFcn() {
  for (int ch=0; ch < (lastVeluxChannel * 2); ch++) {
    if (shutterDisableCounter[ch] > 0) {
      shutterDisableCounter[ch] -= 1;

      if (shutterDisableCounter[ch] == 0) {
        // disable signal-contact
        veluxSetChannel(ch + 1, false);
      }
    }
  }
}
Final device
There was plenty of space available within the housing, so I drilled a hole in one of the sides to have access to the USB-port of the ESP8266. The KLF-inputs were soldered to the ESP8266 directly, as they are using 3.3V-levels using simple pull-ups. As you can see in the following picture, I added an additional connector to the right side:
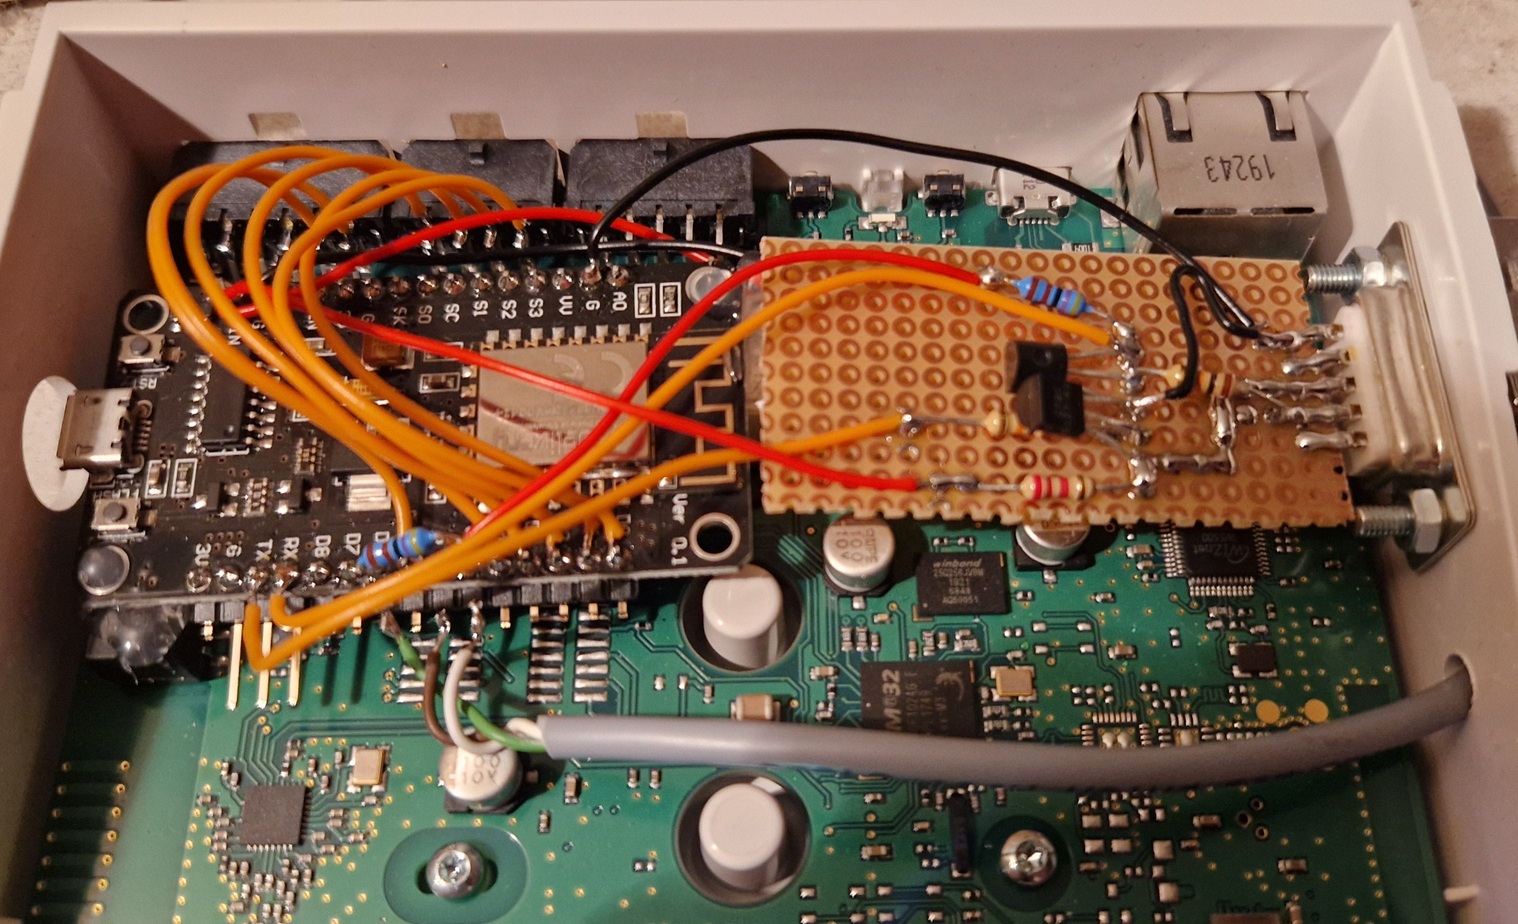
As the ESP8266 had lot of space available and I only use three shutters for the roof windows in our house, I only had to connect the KLF200 inputs 1 to 6. This left me with one free Rx/Tx connection on the ESP8266. Here I attached the right-hand board visible in the picture and built a level converter with two BC337 transistors in order to be able to output RS232 signals (with LVTTL levels). I use this to control my PC_DIMMER RS232 dimmer pack, which I use to light our living room. Now I can also adjust the living room lighting via NodeRED using MQTT without having to use another ESP. And there is enough space in the KLF200 housing to add more technology if required. As another gimmick, I connected a DHT11 sensor to D6 and can also plot the living room temperature and humidity in NodeRED. It wasn't necessary, but its nice to have another graph in the GUI at no extra cost.
NodeRED keeps track of the current sun-position and opens and closes the shutters of the specific side of the roof. Before noon it closes the shutters on the south-east side of the roof and in the afternoon it closes the shutters of the north-west side. There are motor-controlled shutters on the south-front of the house as well - they are closed around noon and opened in the evening again.
Download the software
As this is a fairly small project, I did not create a GitHub-project for this but you can download the full sourcecode here: Velux2MQTT Project
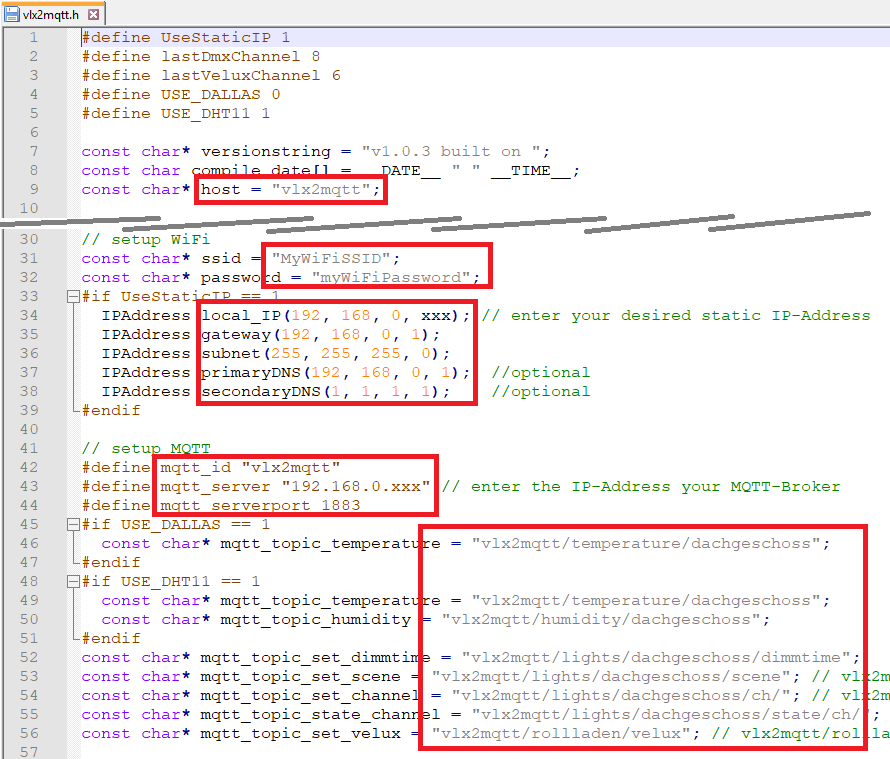
You can then configure the firmware in the “vlx2mqtt.h” file:
- Lines 1 to 5: Basic configuration of the system Line 9: Host name of
- the device in the network Lines 31 to 38: Configuration of the WLAN
- and the IP address Lines 43 to 56: Configuration of the MQTT broker
- and the individual topics Lines 90 to 95: Configuration of the
- individual light scenes for the PC_DIMMER dimmer pack
Further improvements
One drawback of this solution is, that we get no feedback of the KLF200 about the current position of the shutters. We could add an internal variable to keep track of the estimated position of each shutter and send this variable via MQTT. But at the moment I'm quite satisfied with the current solution as I just need the two "open" and "close" positions. Its up to you, to improve this device :)
Comments