In this final episode I'll show how I implemented data-exchange with my card using IRQ and the development of some ShellExtensions and ControlPanel-applets for Windows98.
Fixing the SRAM
Last time I had some problems with my second SRAM producing noise. It turned out, that I missed two additional lines in the documentation: besides the chip-select both SRAMs have individual Write-Enable-connections - I've simply read garbage as there was no data in the second SRAM. After adding two more lines the PCI-card was finally able to play stereo-sound.
For the first tests I've implemented a polling-mechanism: the computer-program reads every 5 to 10ms the fill level of the FIFO-buffer. If the level is below 50% of the buffer, the computer sends new audio-samples and fills the buffer up to 100% again. This mechanism is not the most perfomant because the computer cannot go into an idle-state but has to request the card over and over again which produces some load both on the CPU and the PCI-bus.
Using IRQs and testing them under DOS 6.22
In the PCI-specification Intel and the other companies provided a more efficient method: Interrupt Requests, or IRQs. When the PCI-card asserts the IRQ-pin, the PCI-host triggers the call of an Interrupt Service Routine (ISR) which is a small piece of code within the user-program. Within this ISR, new audiosamples are sent to the PCI-card filling up the FIFO-buffer. So the card requests new data on its own instead of waiting for new data.
The implementation in the FPGA is very simple: just another pin-connection that is asserted when the fill level of the FIFO buffer is below 50%. The IRQ-pin stays asserted until new data is received - that's it. But on the PC side a bit more has to be done:
For getting started with x86-IRQ-handling, I used DOS 6.22 instead of Windows 9x as Windows is preventing us from accessing the hardware interrupts directly. I used a Borland C++ compiler for this. The general procedure is something like this:
- Create an Interrupt Service Routine (ISR) that can be called when an IRQ happens
- Install this ISR using the interrupt-vectors
- Make sure that other ISRs are called as well to prevent other hardware malfunctioning when IRQs are shared
Under DOS this is very easy to manage. After including some header-files, the ISR and the original IRQ-handler is programmed within a couple of lines. Within the main-function I push my own ISR in between the original IRQ and the original ISR. Finally the main-loop is calling the function bioskey() to check if the user is pressing the Escape-button (decimal 27):
// first some includes
#include "conio.h"
#include "stdio.h"
#include "dos.h"
#include "bios.h"

// the pointer to the original handler
void interrupt far (*oldIRQ10Handler)(...);

// our ISR
volatile int triggeredFPGA = 0;
void interrupt isrFPGA(...) {
  triggeredFPGA = 1;

  // send data to our PCI-card to reset the IRQ
  outport32(0x6300, 0x00000000); // external function using asm

  oldIRQ10Handler();
}

int main() {
  // receive the original interrupt vector for IRQ10 and push our
  // own function in between by placing a new interrupt vector
  oldIRQ10Handler = getvect(0x0a);
  setvect(0x0a, isrFPGA);

  // a while-loop until the user pushes the Escape-button
  char key = 0;
  do {
    if (triggeredFPGA > 0) {
      triggeredFPGA = 0;
      printf("ISR for IRQ10 triggered...\n");
    }

    key = bioskey(1);
  } while(key != 27);
  return 0;
}
Programming interrupts under Windows 9x
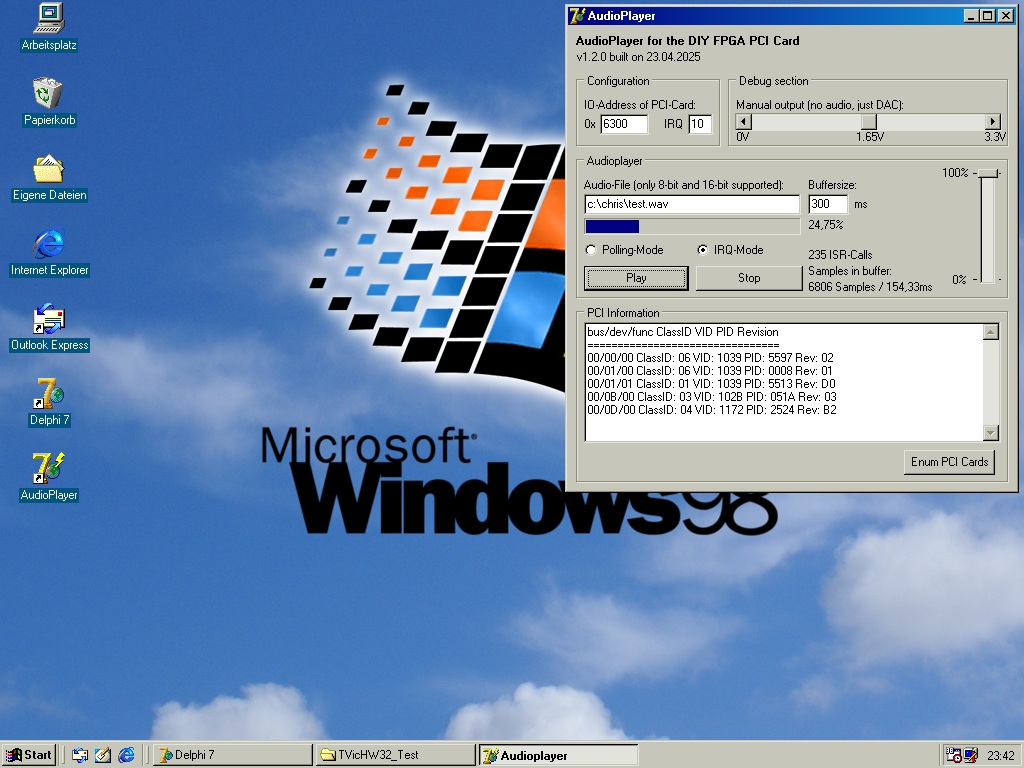
OK, my card is working under DOS but my plan was writing an application for Windows. So I searched how to manage IRQs under Windows 9x which is a combined 16-/32-bit operating system making it a bit harder to access low-level functions of the x86. My internet research lead me to a nice combination of driver and library: the TVicHW32 developed by EnTech Taiwan. The website is still alive, but the most recent version is from 2004 - more than 20 years ago. The online-purchase option is no longer available and the project looks a bit abandoned. But I found out, that this library/driver-combination is used in a bunch of hardare-devices where you can still download the drivers. So I extracted the version 5 of this library from one of the software-packages I've found in the internet. I received the following three files:
- TVicHW32.vxd (32-bit Driver for Windows 9x)
- TVicHW32.sys (32-bit Driver for WindowsNT4, 2k, XP)
- TVicHW32.dll (library to access the driver)
The demo-version contains a nice help and some demo-programs that were really helpful. The general process is very comparable to the DOS when using this library. The following code shows my Delphi-code to initialize the driver, place the ISR and activating the IRQ:
// variables for access the driver
hw32 : THandle;
ClearRec : TIrqClearRec;

procedure openPciDriver;
var
  IrqShared : byte;
begin
  // first open the driver. There are two devices, we are choosing
  // Device0 for the audio-data
  HW32 := OpenTVicHW32(HW32, 'TVicHW32', 'TVicDevice0');

  // extended IRQ-handling by the driver
  FillChar(ClearRec,SizeOf(ClearRec), 0);
  ClearRec.ClearIrq := 1; // 1 - Irq must be cleared, 0 - not
  ClearRec.TypeOfRegister := 1; // 0 - memory, 1 - ioport
  ClearRec.WideOfRegister := 4; // 1 - Byte, 2 - Word, 4 - Double Word
  ClearRec.ReadOrWrite := 1; // 0 - read register to clear Irq, 1 - write
  ClearRec.RegBaseAddress := $6304; // Memory or port i/o register base address to clear
  ClearRec.RegOffset := 0; // Register offset
  ClearRec.ValueToWrite := $00000000; // Value to write (if ReadOrWrite=1)

  IrqShared := 1;
  UnmaskIRQEx(HW32, _irq, IrqShared, @OnHWInterrupt, @ClearRec);
end;
ClearRec contains some configuration for the drivers and enables the auto-clearing of the IRQ. In the shown case the driver sends a 32-bit value to the given io-address 0x6300 to deassert the IRQ.
The function OnHWInterrupt() then handles the sending of new audio-samples:
procedure OnHWInterrupt(IRQNumber:WORD); stdcall;
var
  endOfFile : boolean;
begin
  if (IRQNumber = 10) then
  begin
    // this is the expected interrupt

    // write next chunk of audio-data
    txAudioDataChunk();
  end;
end;
That's all we have to do. The whole magic of low-level-communication is done in the TVicHW32-driver. But I will not going deeper into the rabbit hole of Windows-programming - for an electrical engineer like me that's deep enough :) but I'd like to see some more GUI-applications for Windows like a control-panel-applet and some property-tabs like other drivers present to the user. So I'm not at the end of my journey...
PropertySheetExtensions for Windows9x
While using Windows 98 with my ELSA Erazor III or my Matrox Marvel G400 graphics card, I realized the additional tabs to control the cards in the Windows UI. Microsoft built Windows in such a way, that almost everything can be extended, so the property tabs in a dialog using the property sheet extension. A property sheet extension, in the context of Windows Shell extensions, allows developers to add custom property pages to an object's property sheet. These extensions enhance the default property sheet by providing additional settings and information relevant to specific object types.
These extensions are offered using COM+. COM+ applications in Windows are a way to group and manage COM (Component Object Model) components, providing a common framework for security, configuration, and deployment. They are essentially a container for related COM components, offering features like transactions, security boundaries, and component loading/unloading. My goal was to write such a DLL by exporting the following functions:
exports
  DllGetClassObject,
  DllCanUnloadNow,
  DllRegisterServer,
  DllUnregisterServer;
Delphi already offers lots of helper-classes to create a COM+ application via the TComObject and TComObjectFactory. In the initialization-area I create a new instance of a TComObjectFactory-class offering the new Property-sheet as well as the names and the type of execution:
initialization
  TPropertySheetFactory.Create(ComServer, TPropertySheet, Class_DiyFpgaPropertySheet,
    'DiyFpgaPropertySheet', 'DIY FPGA', ciMultiInstance, tmApartment);
finalization
  // nothing to do here
end.
Within the TPropertySheet class I had to implement the function "AddPages()" that is expected by Windows when loading a new property-sheet-tab:
function TPropertySheet.AddPages(lpfnAddPage: TFNAddPropSheetPage; lParam: LPARAM): HResult; stdcall;
begin
var
  psp: TPropSheetPage;
  hPage: HPropSheetPage;
begin
  FillChar(psp, SizeOf(psp), 0);
  psp.dwSize := SizeOf(psp);
  psp.dwFlags := PSP_USETITLE or PSP_USECALLBACK;
  psp.hInstance := HInstance;
  psp.pszTemplate := MAKEINTRESOURCE(IDD_EMPTYSHEET);
  psp.pszTitle := PChar('DIY FPGA PCI Card');
  psp.pszIcon := MAKEINTRESOURCE(IDD_ICON);
  psp.pfnDlgProc := @PropertySheetDlgProc;
  psp.pfnCallback := @PropertySheetCallback;
  psp.lParam := Integer(Self); // points to the TPropertySheet instance

  hPage := CreatePropertySheetPage(psp);

  if hPage <> nil then
  begin
    if not lpfnAddPage(hPage, lParam) then
    begin
      DestroyPropertySheetPage(hPage);
    end;
  end;

   // Prevent the class from being destroyed before the COM server is destroyed.
  _AddRef;

  Result := NOERROR;
end;
The TPropertySheetPage-object needs some general information about the new dialog (size, flags, title, etc.). The property pszTemplate is a bit special: here windows expect some ressources containing the dialog as a ressource-file. I implented an empty form (IDD_EMPTYSHEET) using ressource-files as I wanted to create the dialog using my VCL-form-editor.
Besides the necessary information about the tab itself it registeres two callback-functions: "PropertySheetDlgProc" and "PropertySheetCallback". PropertySheetDlgProc is used to receive window-messages when initializing, opening or closing the tab. When receiving the message WM_INITDIALOG we will create a parented window using the Delphi VCL:
function PropertySheetDlgProc(hDlg: HWND; uMessage: UINT; wParam: WPARAM; lParam: LPARAM): Boolean; stdcall;
begin
  case uMessage of
    WM_INITDIALOG:
    begin
      // create parented VCL-Form and inject it into the calling handle
      mainform := Tmainform.CreateParented(hDlg);
      mainform.Show;
      Result := True;
    end;
    else
      Result := False;
  end;
end;
"mainform" is a regular VCL-form containing buttons, text and code for our property-sheet with a window-border set to bsNone and a size aligned to its parent. Because this form is created using CreateParented() it will be drawn by the parented dialog-window.
The second callback-function will be used just for releasing our own window when the dialog will release:
function PropertySheetCallback(hWnd: HWND; uMessage: UINT;
  var psp: TPropSheetPage): UINT; stdcall;
begin
  case uMessage of
    PSPCB_RELEASE:
      if psp.lParam <> 0 then
        // Allow the class to be released
        TPropertySheet(psp.lParam)._Release;
  end;
  Result := 1;
end;
The new dialog fits very well into the Windows UI:

The code of this Windows-extension can be found in the GitHub-Repository.
Control-Panel-Applet
Now that I was able to create own dialog-sheets, the last point on the TODO-list was a self-developed controlpanel-applet. These apps are standard libraries containing a form. The control-panel searches for *.cpl-files in the Windows\System directory and tries to load the function "CPlApplet()" with different messages. The exported CPlApplet()-function looks like this:
function CPlApplet(hwndCpl: HWND; msg: UINT; lParam1: LPARAM; lParam2: LPARAM): integer; stdcall;
begin
  case msg of
    CPL_DBLCLK,
    CPL_STARTWPARMS:
      // create a new window and show it as a modal window
      mainform := Tmainform.Create(nil); // this works
      // but maybe we should create the window parented?
      //mainform  := Tmainform.CreateParented(hwndCpl);
      mainform.ShowModal; // show the window as modal window
      mainform.Free; // free the form when closed
    CPL_INIT,
    CPL_STOP,
    CPL_GETCOUNT,
    CPL_NEWINQUIRE:
      begin
        // tell the calling controlpanel, that we are ready
        Result := 1;
        exit;
      end;
    CPL_INQUIRE:
      // give some information about us (name and description)
      with PCPLINFO(lParam2)^ do begin
        idIcon := 1;
        idName := PResStringRec(@Name)^.Identifier;
        idInfo := PResStringRec(@Description)^.Identifier;
        lData := 0;
      end;
  end;
  Result := 0;
end;

exports
  CPlApplet;

begin
end.
PCPLINFO is just a small struct containing some general information about the controlpanel applet:
  tagCPLINFO = packed record
    idIcon : Integer;
    idName : Integer;
    idInfo : Integer;
    lData : LongInt;
  end;
  TCPLInfo = tagCPLINFO;
  PCPLINFO = ^TCPLInfo;
With only a couple of lines of code the new controlpanel-application is shown within the Windows controlpanel:

New Tab in the device-manager
Many drivers of PCI-cards adds a new TAB to the device-manager if you double-click on an item like the PCI SoundCard. So I tried to implement this, too. Now that I was able to push own dialog-tabs in between the UI of Windows I thought it would be the same procedure - but no. As I said previously, Windows is a hybrid 16-bit/32-bit operation system. Maybe for the sake of backwards-compatibility Microsoft expects the EnumPropertySheet-Extensions to be 16-bit DLLs.
So I opened my Borland Delphi 1 as this compiler is able to compile 16-bit DLLs. As this blog-entry is quite large already, I will not go into the details, but I had to create a resource-file containing my dialog, recreate a lot of objects, that are available in newer compilers from scratch and after lot of hours I managed to compile a working library that injects a new tab to the device-manager.
Interfacing my 16-bit DLL with the 32-bit Windows-API was quite challenging as I could not use regular types like "Pointer" or "Integer" as these are all 16-bit types in Delphi 1. I had to force the parameters to LongInt to make sure it uses 32-bit variables for the exchange. First I had to create the TPropSheetPage struct in Delphi 1:
  TPropSheetPage = record
    dwSize: LongInt;
    dwFlags: LongInt;
    hInstance: THandle;
    case THandle of
      0: (
        pszTemplate: PChar);
      1: (
        pResource: LongInt;
        case LongInt of
          0: (
            hIcon: THandle);
          1: (
            pszIcon: PChar;
            pszTitle: PChar;
            pfnDlgProc: LongInt;
            lParam: LongInt;
            pfnCallback: TFNPSPCallback;
            pcRefParent: PLongInt;
            pszHeaderTitle: PChar;
            pszHeaderSubTitle: PChar));
  end;
Then I had to import functions from CommCtrl.dll of Windows, to create my dialog:
function CreatePropertySheetPage(var PSP: TPropSheetPage) : HPropSheetPage; far;
  external 'COMMCTRL.DLL' name 'CreatePropertySheetPage';

function DestroyPropertySheetPage(hPSP: HPropSheetPage) : Bool; far;
  external 'COMMCTRL.DLL' name 'DestroyPropertySheetPage';
The library than had to export one single function that the device-manager will load:
function FpgaEnumPropPages(lpvoid: LongInt;
  lpfnAddPage: TFNAddPropSheetPage; lParam: LPARAM) : BOOL; export;
var
  psp: TPropSheetPage;
  hPage: HPropSheetPage;
begin
  FillChar(psp, SizeOf(psp), 0);
  psp.dwSize := SizeOf(psp);
  psp.dwFlags := PSP_USETITLE;

  psp.hInstance := HInstance;
  psp.pszTemplate := MAKEINTRESOURCE(IDD_EMPTYSHEET);

  psp.pszIcon := MAKEINTRESOURCE(IDC_ICON);
  psp.pszTitle := PChar('DIY FPGA PCI Card');
  psp.pfnDlgProc := LongInt(@PropertySheetDlgProc);
  psp.pfnCallback := nil;
  psp.pszHeaderTitle := PChar('TEST');
  psp.pszHeaderSubTitle := PChar('TEST');

  hPage := CreatePropertySheetPage(psp);

  if (hPage <> 0) then
  begin
    if not lpfnAddPage(hPage, lParam) then
    begin
      DestroyPropertySheetPage(hPage);
    end;
  end;

  Result := TRUE;
end;

exports
  FpgaEnumPropPages;

begin

end.
To let the device-manage know about this exported function, one entry has to be set into the registry under: HKEY_LOCAL_MACHINE\System\CurrentControlSet\Services\Class\MEDIA\0000 Here the Entry "EnumPropPages" has to be set to "fpgaprop.dll,FpgaEnumPropPages"
And this leads us to a nice dialog within the device-manage. Wow - what a journey:

Completing the driver-inf-file
In part 2 of this blog-series two weeks ago I already showed the general structure of my inf-file to let Windows enumerate the DIY PCI Card within the Windows Device Manager. Now I'd like to complete this inf-file to let Windows copy the nescessary driver-files when detecting the card using Plug&Play.
For this Microsoft implemented the tag "CopyFiles" within the inf-files. To register COM+ DLLs the tag "RegisterDLLs" can be used:
[DefaultInstall]
CopyFiles = TVicHW32.Files.Sys, FPGA.Files.Sys, FPGA.Files.Inf
RegisterDlls = FPGA.Files.Sys ; Windows9x is not using "DIRID,,Filename,Flag" but only a filelist
Within the section "DestinationDirs" we can select in which directory the files should be copied:
[DestinationDirs]
TVicHW32.Files.Sys = 11 ; 11 = C:\Windows\System
FPGA.Files.Sys = 11 ; 11 = C:\Windows\System
FPGA.Files.Inf = 17 ; 17 = C:\Windows\Inf
Finally, the named sections contain the individual files:
[TVicHW32.Files.Sys]
TVicHW32.vxd
TVicHW32.sys
TVicHW32.dll

[FPGA.Files.Sys]
fpgatab.dll
diyfpga.cpl

[FPGA.Files.Inf]
diyfpga.inf
That's it: we have a nice driver-installation-file that can be used to place our card in the Windows Device Manager under "Audio-,Video- and Gamecontroller", copy all necessary files to the desired directories and register the COM+ files to showup our own dialogs in the Windows property dialogs.
Within this project I discovered the secrets of expansion-cards for an x86-computer, especially the PCI-bus, the Windows-driver-system and the Windows-UI... and everything in just a couple of weeks. In the first days I was not sure if I can get enought information about these abandoned operating systems. And indeed partially it was very hard to find the right information, because the information in MSDN and the general internet showed information about driver-models and data for Windows 2000 and later. But in the end, it pays off to simply start a project and, with a little perseverance, to navigate through difficult areas.
With the complete inf-file I will close this blog post today. If you have ideas what could be implemented using this technology, please write a small comment or send me an eMail:
; Description : Windows9x Driver for the DIY FPGA PCI Card
; InfVersion  : 1.05
; Comment     : More information under https://github.com/xn--nding-jua/FPGA_PCI_Card
; Comment     : For more projects have a look at https://chrisdevblog.com as well
; Language    : English
; OS          : Windows 95/98/ME
; Copyright   : (c) 2025 by Chris Noeding, Germany
; -------------------------------------------------------------------------

[Version]
Signature = "$CHICAGO$"
Class = MEDIA
Provider = %NDNG%
LayoutFile = layout.inf
DriverVer = 05/04/2025,1.0.1000.00005 ;mm/dd/yyyy,w.x.y.z
SetupClass = BASE

[Manufacturer]
%VENDOR% = Vendor

[Vendor]
%FPGA01.DeviceDesc% = DefaultInstall,PCI\VEN_1172&DEV_2524

[ClassInstall]
AddReg = DefaultClassInstall

[DefaultClassInstall]
HKR,,,0,%ClassString%
HKR,,Icon,0,"-1"
HKR,,EnumPropPages,,"fpgaprop.dll,FpgaEnumPropPages"

[DefaultInstall]
CopyFiles = TVicHW32.Files.Sys, FPGA.Files.Sys, FPGA.Files.Inf
AddReg    = FPGA.Add.Reg
RegisterDlls = FPGA.Files.Sys ; Windows9x is not using "DIRID,,Filename,Flag" but only a filelist

[Uninstall]
DelFiles = TVicHW32.Files.Sys, FPGA.Files.Sys, FPGA.Files.Inf
DelReg = DelCLSIDKey


[SourceDisksNames]
1 = %DiskName%,"",1

[SourceDisksFiles]
TVicHW32.vxd = 1
TVicHW32.sys = 1
TVicHW32.dll = 1
fpgatab.dll = 1
fpgaprop.dll = 1
diyfpga.cpl = 1
diyfpga.inf = 1

[DestinationDirs]
; 10 = C:\Windows
; 11 = C:\Windows\System
; 12 = C:\Windows\System32
; 17 = C:\Windows\Inf
; 18 = C:\Windows\Help
; 24 = C:\
; -1 = absolute path
TVicHW32.Files.Sys = 11
FPGA.Files.Sys = 11
FPGA.Files.Inf = 17

[TVicHW32.Files.Sys]
TVicHW32.vxd
TVicHW32.sys
TVicHW32.dll

[FPGA.Files.Sys]
fpgatab.dll
fpgaprop.dll
diyfpga.cpl

[FPGA.Files.Inf]
diyfpga.inf

[FPGA.Add.Reg]
HKLM,"Software\Microsoft\Windows\CurrentVersion\Controls Folder\Display\shellex\PropertySheetHandlers\DiyFpgaPropertySheet",,,"{21C1AC3C-8392-4E9C-A8DD-4D3EEEF5729C}"
HKCR,CLSID\{21C1AC3C-8392-4E9C-A8DD-4D3EEEF5729C}\InProcServer32,,,"%11%\fpgatab.dll"
HKCR,CLSID\{21C1AC3C-8392-4E9C-A8DD-4D3EEEF5729C}\InProcServer32,ThreadingModel,,"Apartment"
;HKLM,Software\Microsoft\Windows\CurrentVersion\Run,"Name for Entry",,"Command to run"

[DelCLSIDKey]
HKCR,CLSID,{21C1AC3C-8392-4E9C-A8DD-4D3EEEF5729C}

[Strings]
NDNG = "Noeding"
VENDOR = "Noeding"
DiskName = "DIY FPGA PCI Card Driver Disk"
FPGA01.DeviceDesc = "DIY FPGA PCI Card Rev1"
ClassString = "Audio-, Video- und Game-Controller"

; -------------------------------------------------------------------------
Comments