Linux, being a highly versatile and flexible operating system, can be configured to run on a wide variety of hardware - including Behringers X32...
If you are using a fullsize X32 console like me, you might have realized the huge amount of different connectors at its back. While working on my own Audio-Over-IP-protocol I used my console as a test-audio-source. On connecting some cables, I realized that I used almost any connector - at least once. But there is one single connector I haven't used up to now - and I bet you haven't either: a single USB-Type-B connector next to the ethernet-jack. There is no information in the documentation or the internet up to now and the manual says a short "its for remote control".
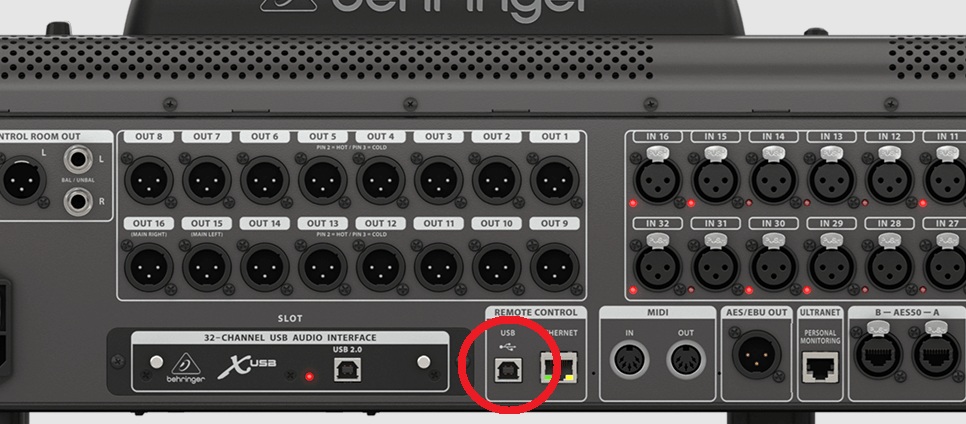
The first idea was to connect an USB-cable, lookup the Vendor- and Product-ID to check what device is connected on the other side. But guess what: nothing happens - literraly nothing! What is the first thing to do: ask the AI - but even the most recent models are not helpful: "The USB Type-B connector on the rear panel of the Behringer X32 (not the one on the expansion card slot) is used for remote control of the mixer." What a help. Even on providing a picture there was no helpful information. So, when AI is not helpful at all, we have to make use of our natural intelligence... It took me a while until I figured out, that the console has a firmware-recovery-mode when pressing one of the two hidden buttons on the back of the console. Doing this, an USB-device enumerates in the Windows-device-manager.
The vendor-ID is 0x15a2 and the product-id is 0x003a. Looking into the USB-vendor-database the vendor is Freescale and the product-id seems to be a "Freescale i.MX25 USB BulkIO Device". During my investigations on the expansion card I had a look into my X32core. There the main-cpu is accessible and I had a look on it: a Freescale MX253 microcontroller containing an ARM926-core. Wait, this ARM is clocking at 400MHz and is able to run Linux. Could it be possible to run Linux on the X32?
How to start own software
Freescale offers a Serial Download Protocol over a USB-connection and the USB-Type-B-connector is connected to our iMX-processor directly. As the i.MX25 is on the market since more than 15 years, there are different tools to upload code over USB: the official Freescale ATK, mfgtools, its successor UUU, imx_usb_loader and pyATK. Unfortunately, the iMX25 is not supported by the most recent tools like UUU or imx_usb_loader and the older tools like the Freescale ATK has dependencies, I could not manage to fulfill with a modern Debian-system. But pyATK looks promising as it uses Python and supports at least python 3.4. So I cloned the repository, installed the dependencies in a virtual-python-environment and tried to start the tool. As I'm using Debian 12 with Python 3.11 there was a minor problem with the code, but I could fix this by changing three lines of code. A first test looked promising and the iMX25 was detected successfully.
Regarding to the reference manual, the iMX-start-procedure looks like this: After PowerOnReset it loads the ROM which starts USB and enumerates it as a dedicated device like an HID device. The host-computer then has to initialize the memory and sends a program to the ram. After the upload has finished, the SerialDownloadProgram will jump to the first byte of the uploaded code. This means, we have to write a very small test-program, to see if the memory is initialized correctly and the upload is working well. Furthermore, we seem to have full access to all registers using this protocol - pretty nice.
Looking at my X32core-CPU-mainboard, the X32 uses 64MB of LPDDR RAM from Micron. It took me a while to read the 2,596 pages of the iMX25 reference manual, but I found the important registers to initialize the LPDDR RAM. With this information I created a memory-initialization-file for pyATK. The only thing we need is a small test-program that turns on an LED or something comparable. As the X32 can adjust the brightness of the LCD or the desk-lamp and the speed of the fan, I asked the AI, if the iMX253 has PWM-outputs and it told me, that it has one single PWM-output. So lets give it a try and write a small program that turns-on this specific output and see what happens... hopefully no internal voltage-regulator that blows something up when setting the pin to high.
As we do not have an operating system, we have to program the controller bare-metal. This means: assembler or C. I found a small assembler-skeleton for the iMX25 in the internet. So lets try to initialize the PWM-output and set it to logical 1. From the reference manual I learned, that we have to switch the IOMUX-register to the desired function, set the pin-direction to output and set the output to the desired value. The PWM-output can be routed to a standard GPIO-function. So this is what I want to do now:
        ; IOMUX is at 0x43FAC, PWM-Output is at offset 0x11c
        ; enable ALT5
        ldr r0, =0x43FAC11C
        ldr r1, =0x00000005
        str r1, [r0]

        ; disable Pull-Resistors in offset 0x314 of IOMUX
        ldr r0, =0x43FAC314
        ldr r1, =0x00000000
        str r1, [r0]

        ; GPIO-register is at 0x53FCC, GPIO-direction is at offset 0x004
        ; set direction of GPIO to output
        ldr r0, =0x53FCC004
        ldr r1, =0x04000000
        str r1, [r0]

        ; set output to high
        ldr r0, =0x53FCC000
        ldr r1, =0x04000000
        str r1, [r0]
The Boot-ROM will jump to the first byte of the uploaded code once the upload has finished, so we have to make sure, that our reset-handler is placed at the first byte of our code using a map-file. After compiling the code with an arm-assembler, the desk-lamp turned on - success!!!
Thinking about more
Now that we are able to run our own code, we can think about more. Several years ago, Freescale offered a so called LTIB, a Linux Target Image Builder. It would be great to start Linux on the X32, right? But since Freescale has been aquired by NXP in 2015, it is quite hard to get the necessary tools for the iMX25 - at least a consistent documentation is missing. But the mainline Linux-kernel itself has support for the iMX25. To start the linux-kernel, a tool called U-Boot is very common. So lets try to get this thing up on our iMX25.
It took me a while to find the right U-Boot-version that supports the iMX25 and is able to work with recent versions of the compiler-toolchain. U-Boot in version 2020.10 seems to be the last version, that supports our processor. So lets check out this version.
The common way to configure the U-Boot is using the menuconfig. First we have to create a default-config for the iMX25. U-Boot supports the mx25pdk, a product development kit from Freescale, so we use this as a basis for our journey. Unfortunately, the U-Boot does not support the Linux Device Tree, so we have to initialize the board using plain c-files. Again, we should try to initialize the LAMP, to see if the C-Code is called correctly. For this, we have to edit the mx25pdk.c within the arch/arm/freescale-folder. U-Boot has some convenient macros to deal with the hardware. Within the board_init()-function we can put the IOMUX- and GPIO-configuration with convenient-C-code. If our code works correctly, the lamp should turn on - like in our small assembler-program.
#define LAMP_PWM        IMX_GPIO_NR(1, 26)

int board_init(void) {
    // set GPIOs within IOMUXC
    static const iomux_v3_cfg_t gpio_pads[] = {
        NEW_PAD_CTRL(MX25_PAD_PWM__GPIO_1_26, 0),
    };
    imx_iomux_v3_setup_multiple_pads(gpio_pads, ARRAY_SIZE(gpio_pads));

    // enable LAMP
    gpio_request(LAMP_PWM, "LAMP_PWM");
    gpio_direction_output(LAMP_PWM, 1);
    gpio_set_value(LAMP_PWM, 1);
}
Lets try to compile the U-Boot using a compiler for the arm-architecture: arm-none-eabi-gcc. As my system is an x86-based system, I have to call make using ARCH=arm and CROSS_COMPILE=/usr/bin/arm-none-eabi- make. After some time I received a u-boot.bin and after uploading it with pyATK the desk-lamp turned-on again - a very good sign. Up to this step it took me nearly a week as the documentation is very extensive and it was not clear for me, which documentation I have to follow.
To see if U-Boot (and later the linux-kernel) is working well, it would be great to use a serial terminal. Looking at the PCB of my X32core, I realized that the MIDI-ports are connected to our controller. As MIDI is a serial-connection, a small adapter with some passive components should work to connect my computer to the iMX25. First I had to reverse-engineer the MIDI-circuit, to understand what converter I will need. In the end it is a straight-forward-design using a simple optocoupler with an inverted output for MIDI-in and a simple buffer-IC for MIDI-output. It should be enough to put a pull-up-resistor between the two MIDI-Output-pins and connect the receive-pin to MIDI-minus-pin. To send data it should be fine to pull-up MIDI-IN+ to 5V and connect MIDI-IN- to out transmit-pin as the output of the H11L is inverted.
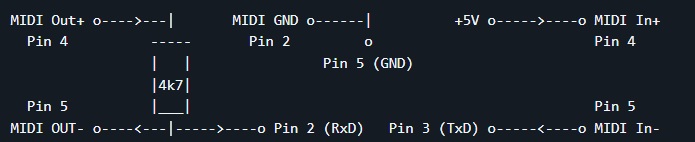
To cut a long story short: it took me a couple of hours to understand two things: the iMX-UART needs a clock from the clock-distribution-system of the iMX25 - and the MIDI-connectors are routed to UART5...
Finally, Linux!
Now that I had a working U-Boot, I was confident enough to venture into linux itself. Back in the days, when the i.MX25 was the hot stuff, Freescale suggested the kernel in version 3.0. As this kernel does not support the so called DeviceTree it was not within my scope - but I tried it in a first place. After a couple of hours I had no luck initializing the hardware in plain c without reading the extensive datasheet. DeviceTree is a data structure and hardware description language for linux to support different types of controllers and peripheral devices from Real-Time-Clocks, over PWM-modules to display-adapters. After a lot of investigation and testing the Freescale imx-fork of linux, I figured out, that even the most recent version of the mainline kernel has support for the i.MX25 - but it is a bit hidden.
Similar to the U-Boot the kernel can be configured using the command "make menuconfig". Unfortunately, the kernel does not have a default-configuration for the MX25, so I had to start from scratch. The first time I did not find the configuration-options for the ARM-architecture either, but I missed to start the menu-configuration with the "ARCH=arm" option. But still, there was no entry for the i.MX25 or compatible. More by accident I tried the default-configuration for the 20-year old MXS-processor - and guess what: now the i.MX25 could be selected by the menu. There must have been some kind of dependency-problem before. Anyway, I was able to configure the system now. First I tested a very basic kernel-configuration.
To safe some space, I compressed the kernel into a self-extracting zImage. It seems to be very common to start the kernel using a wrapper-format for the U-Boot but I'm aware that the U-Boot maintainer calls this strategy "pretty stupid" as each kernel-image has to bring its own decompressing-algorithm, but if this works, I'm fine with it.
Now that I had two binary-files, I hd to merge both files together using the command dd. To keep some degree of freedom for the size of the U-Boot I reserved a bit more space for U-Boot than I need. So I get a fixed offset for the Linux-Kernel-Binary that I had to tell u-Boot within the header-file of the board together with some boot-arguments for the kernel. The starting command is here "bootm" followed by the address of the kernel, a ramdisk that we are not using up to now and the device-tree-blob for the used hardware:
// bootm [kernel_addr] [ramdisk_addr] [dtb_addr]"
bootm 0x80060000 - 0x80800000"
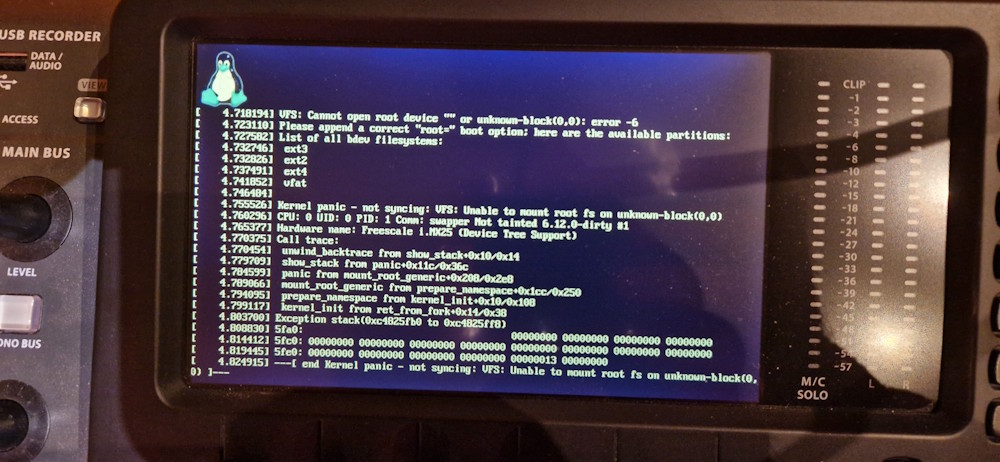
U-Boot is starting... searching for the kernel... and... nothing... So either the kernel is not starting at all or the UART is not working. After some research it turned out, that I used the wrong compiler: for a bare-metal-application like U-Boot I have to use arm-none-eabi, but for starting the linux-kernel out of U-Boot, I have to use arm-linux-gnueabi. Lets try again... and the kernel-startup-messages showed up on the terminal. From now on the development got a new acceleration!
Some software
My goal was to boot into a shell and initialize the most important components like the display, ethernet and maybe the USB-controller to connect a keyboard or an USB-thumbdrive. So I created an initial ramdisk to store some applications. For this I used busybox with the most common linux-tools, configured it with the common linux-tools and cross-compiled it for the ARM. Additionally, I enabled some more features within the DeviceTree of the kernel. From some Replacement-Display-Advertisments for the Behringer X32-Display on eBay I learned, that it must have an 7" display made by Innolux. The iMX25 offers a dedicated LCD-driver for such displays and I've found some code-examples for comparable displays in the internet. I searched for some promising displays and found the Innolux AT070 together with some examples from Freescale using this type of display. I imported the datasheet of one of the AT070TN into Googles Gemini and let the AI calculate the timing-settings for the DeviceTree. By the way, its very convenient to let AI convert tables and interpret them like this.
With the following commands, I compiled the whole system:
# compile U-Boot
cd u-boot
ARCH=arm CROSS_COMPILE=/usr/bin/arm-none-eabi- make
cd ..

# compile linux
cd linux
ARCH=arm CROSS_COMPILE=/usr/bin/arm-linux-gnueabi- make zImage
# create uImage
mkimage -A ARM -O linux -T kernel -C none -a 0x80060000 -e 0x80060000 -n "Linux kernel (OpenX32)" -d arch/arm/boot/zImage /tmp/uImage
cd ..

# compile busybox
cd busybox
ARCH=arm CROSS_COMPILE=/usr/bin/arm-linux-gnueabi- make -j$(nproc)
ARCH=arm make install
cd initramfs_tmp
find . -print0 | cpio --null -ov --format=newc > /tmp/initramfs.cpio
gzip -9 /tmp/initramfs.cpio
# create image for u-Boot
mkimage -A ARM -O linux -T ramdisk -C gzip -a 0 -e 0 -n "Ramdisk Image" -d /tmp/initramfs.cpio.gz /tmp/uramdisk.bin
cd ../..

# glue everything together into a single file
# u-Boot
dd if=u-boot/u-boot.bin of=/tmp/openx32.bin bs=1 conv=notrunc
# Linux-Kernel
dd if=/tmp/uImage of=/tmp/openx32.bin bs=1 seek=$((0x60000)) conv=notrunc
# DeviceTreeBlob
dd if=linux/arch/arm/boot/dts/nxp/imx/imx25-pdk.dtb of=/tmp/openx32.bin bs=1 seek=$((0x800000)) conv=notrunc
# InitramFS
dd if=/tmp/uramdisk.bin of=/tmp/openx32.bin bs=1 seek=$((0x810000)) conv=notrunc
Now our memory-map looks like this: 384kB reserved for U-Boot, 8MB reserved for the Kernel and 64kB for the DeviceTree. The ram-filesystem is appended at the end.
With this in mind, I had to slightly update the boot-command of U-Boot:
// bootm [kernel_addr] [ramdisk_addr] [dtb_addr]"
bootm 0x80060000 0x80810000 0x80800000"
And... yeah! The kernel booted and the display was showing something:
The colors were a bit off and it took me some more hours to figure out, that two connections of the 6-bit blue-channel were missing and the iMX-LCD-driver was set to the wrong mode.
Final system
It took me a while to figure out the details of the hardware, but after a couple of days, I managed to enable the onboard network-PHY (a Microchip LAN8720A), together with the i.MX Freescale Ethernet Controller (FEC) as well as the USB-Host-connection. Now we have a full-featured Linux on the X32, so lets call it "OpenX32". And we can start some nice software on it:
A former colleague once said that a complete life includes having compiled the Linux kernel yourself at least once. This project was not really planned and I stumbled accross it during working on the already mentioned Audio-Over-IP-protocol. But I was able learn an incredible amount about ARM technology, the Linux kernel and cross-compiling in a very short time. If you have some ideas what we can do with this open-source-operating-system for the X32, please let me know in the comments or feel free to support the work on this project. All codes and changes of the linux-kernel are published on my GitHub-repository. A future goal could be the upload of the FPGA-bitstream of the original firmare to initialize the audio-system of the X32 and get information from the faderboards - but that's for a future episode.
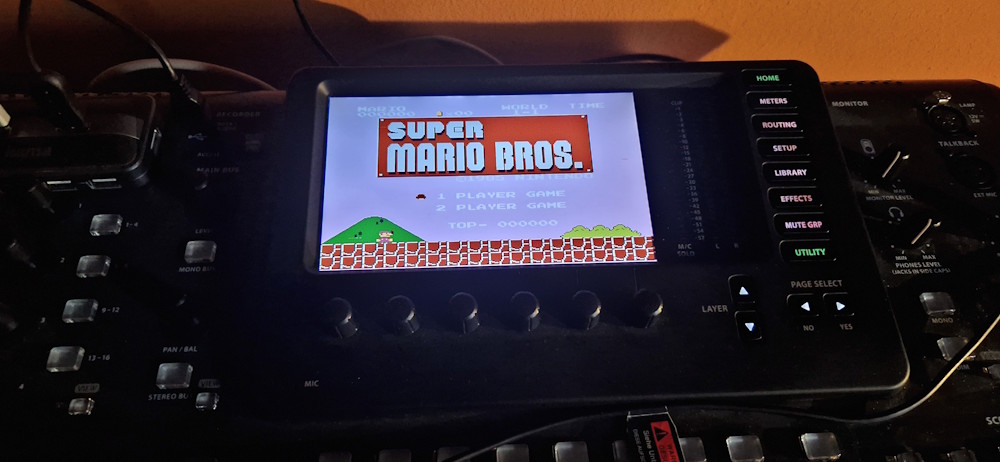
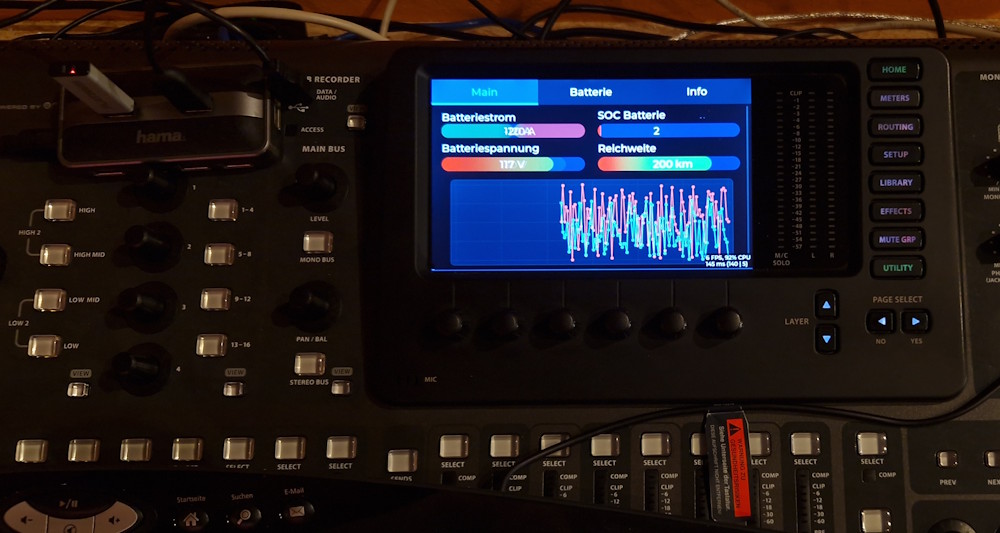
In the end I was able to use the open-source framework LVGL to load on the X32 to create a user-interface using the framebuffer:
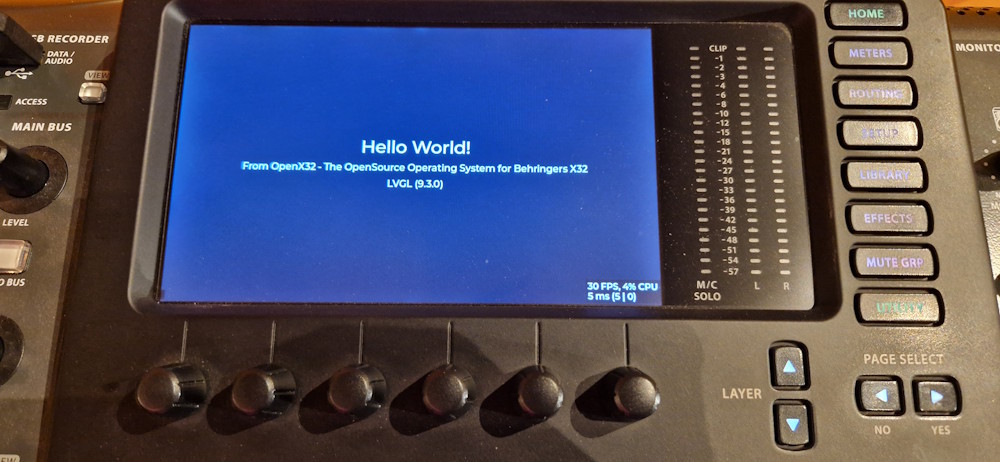
With this framework, even complex user-interfaces are quite easy to create. If I can get the FPGA and the DSPs online, maybe we can create an open-source audio-mixing-console based on this UI-framework:
But that's it for now. Thanks for reading and see you next time!
Comments